How to Build a Home Server for Under $150: Ditching AWS for a Budget-Friendly DIY Solution
Are you tired of skyrocketing cloud service bills from providers like AWS? If you’re running personal projects, websites, or scripts, the costs of cloud hosting can add up quickly. I faced the same issue and decided to take matters into my own hands by building a home server for just $150. In this detailed guide, I’ll walk you through my journey of ditching AWS, the step-by-step process of setting up a budget-friendly server, the benefits of self-hosting, and essential tips to ensure your setup is secure and efficient. Whether you’re a hobbyist, a developer, or someone looking to save on cloud costs, this article will help you get started with your own DIY home server.
Why I Abandoned AWS for a Home Server
Like many developers, I initially turned to Amazon Web Services (AWS) for hosting my projects. AWS offers incredible scalability and reliability, but for small-scale side projects, scripts, and personal websites, the costs were prohibitive. Even with cost-saving options like EC2 Spot Instances, my monthly bills were climbing faster than anticipated. Running multiple scripts 24/7 and hosting a few lightweight applications drained my budget, prompting me to explore alternatives. That’s when I decided to build my own home server—a decision that not only saved me money but also became an invaluable learning experience.
The Goal: Affordable and Functional
My objective was simple: create a low-cost server for non-critical projects without the need for enterprise-grade infrastructure. I didn’t require high-end security or the ability to handle massive traffic. My use case was limited to personal experiments, including a portfolio website, Flask apps, and Python automation scripts. A home server seemed like the perfect solution—affordable, local, and a great opportunity to enhance my technical skills.
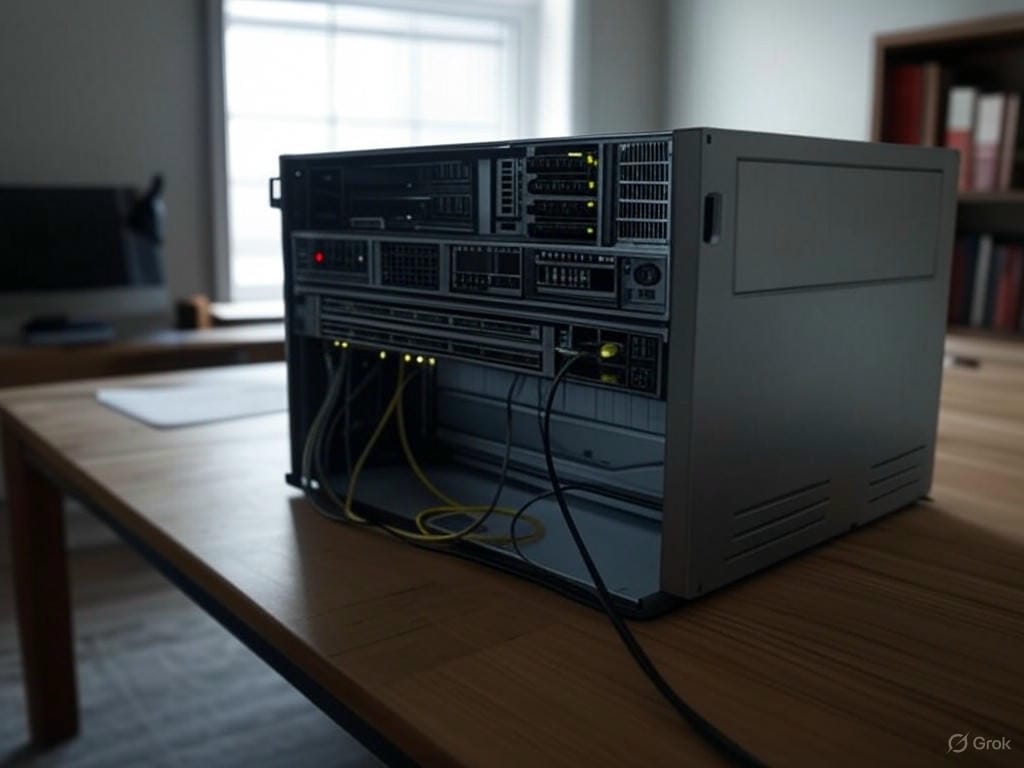
Building the Server: Hardware and Costs
To keep expenses low, I scoured Facebook Marketplace and found a 10-year-old used CPU for $100. The specs were surprisingly decent for the price:
- Intel Xeon E5 processor
- 32GB DDR4 RAM
- 8GB VRAM (adequate for basic testing)
However, I made a rookie mistake by not checking for an SSD or Wi-Fi chip. To make the server functional, I invested a bit more:
- A USB Wi-Fi adapter for connectivity
- A 256GB SSD for storage
I installed Ubuntu Server on the SSD and connected the system to my router via a LAN cable to set up the Wi-Fi drivers. The total cost came to around $150, resulting in a fully operational home server at a fraction of what I’d spend on cloud services over a few months.
Setting Up the Home Server: Step-by-Step
Once the hardware was ready, the setup process began. I installed Ubuntu Server, a lightweight and reliable operating system for hosting. Configuring the server involved:
- Setting up basic networking (initially via LAN to install Wi-Fi drivers)
- Installing essential software for my projects
- Using tools like tmux to keep scripts running in the background 24/7
- Configuring auto-start settings to ensure the server reboots seamlessly after power outages
Though I encountered networking hiccups and overlooked hardware compatibility issues, these challenges taught me valuable skills, such as configuring a server from scratch and setting up a basic firewall for added security.
What My Home Server Runs Today
My DIY server now handles a variety of tasks without the worry of draining my laptop battery or incurring AWS fees. Currently, it runs:
- My personal portfolio website
- Backend services for side projects using Flask
- Python scripts for scraping and automation, running continuously via tmux
This setup allows me to experiment freely without the constant concern of accidental shutdowns or escalating costs.
Security Considerations for a Home Server
Let’s address the elephant in the room: security. Running a home server, especially if it’s public-facing, comes with risks. If you’re handling sensitive user data, processing payments, or expecting high traffic, a DIY server may not be the safest choice unless you’re well-versed in cybersecurity. However, for my purposes—hosting low-risk, personal projects with no external access or sensitive data—this setup works perfectly. I’ve implemented basic security measures like a firewall and limited access to ensure minimal exposure. For those considering a similar setup, always prioritize security by keeping software updated, using strong passwords, and avoiding unnecessary public access.
Lessons Learned and Unexpected Benefits
Building my home server wasn’t without its challenges. Forgetting to check for Wi-Fi support and struggling with initial networking issues were frustrating, but they turned out to be blessings in disguise. I gained hands-on experience in:
- Configuring Ubuntu Server from the ground up
- Setting up firewalls for basic protection
- Managing persistent processes with tmux
- Ensuring system reliability during power interruptions
Even if this project hadn’t saved me money, the knowledge and skills I acquired made it worthwhile. Plus, I no longer have to worry about AWS bills eating into my budget.
Additional Benefits of a Home Server
Beyond cost savings, a home server offers numerous perks. It can serve as a personal cloud for file storage and sharing, a hub for home automation, or even a platform for gaming servers. Inspired by community discussions and resources like self-hosting forums, I’ve realized the potential to expand my server’s capabilities. For instance, many users leverage home servers to replace services like Google Photos for enhanced privacy, a trend I’m eager to explore next.
Is a Home Server Right for You?
If you’re considering a home server, evaluate your needs. For small-scale, personal projects, it’s a fantastic, budget-friendly alternative to cloud services like AWS, Google Cloud, or Digital Ocean. However, for mission-critical applications or high-traffic websites, cloud hosting might still be the better choice due to its scalability and built-in security. If you decide to go the DIY route, start small, learn as you go, and don’t shy away from mistakes—they’re often the best teachers.
Conclusion: Save Money and Learn with a DIY Home Server
Building a home server for under $150 transformed the way I manage my projects. Not only did I escape the recurring costs of AWS, but I also gained practical skills in server management and networking. Whether you’re a tech enthusiast or simply looking to cut cloud hosting expenses, a home server can be a game-changer. Follow the steps I’ve outlined, prioritize security, and embrace the learning curve. Ready to start your self-hosting journey? Dive in and discover the freedom of running your own server!
Leave a Reply