About
BinaryPH AI SEO – The Complete 1-Click AI SEO Solution for WordPress
Supercharge your website’s search engine rankings with the ultimate 1-click AI-driven SEO plugin built for site owners. Whether you want to replace your existing SEO setup or seamlessly enhance it, BinaryPH AI SEO automates the heavy lifting instantly.
Intelligently generate metadata, fix broken links, build internal link structures, and output rich Schema – all powered by your favorite AI models with just a single click.
Key Features:
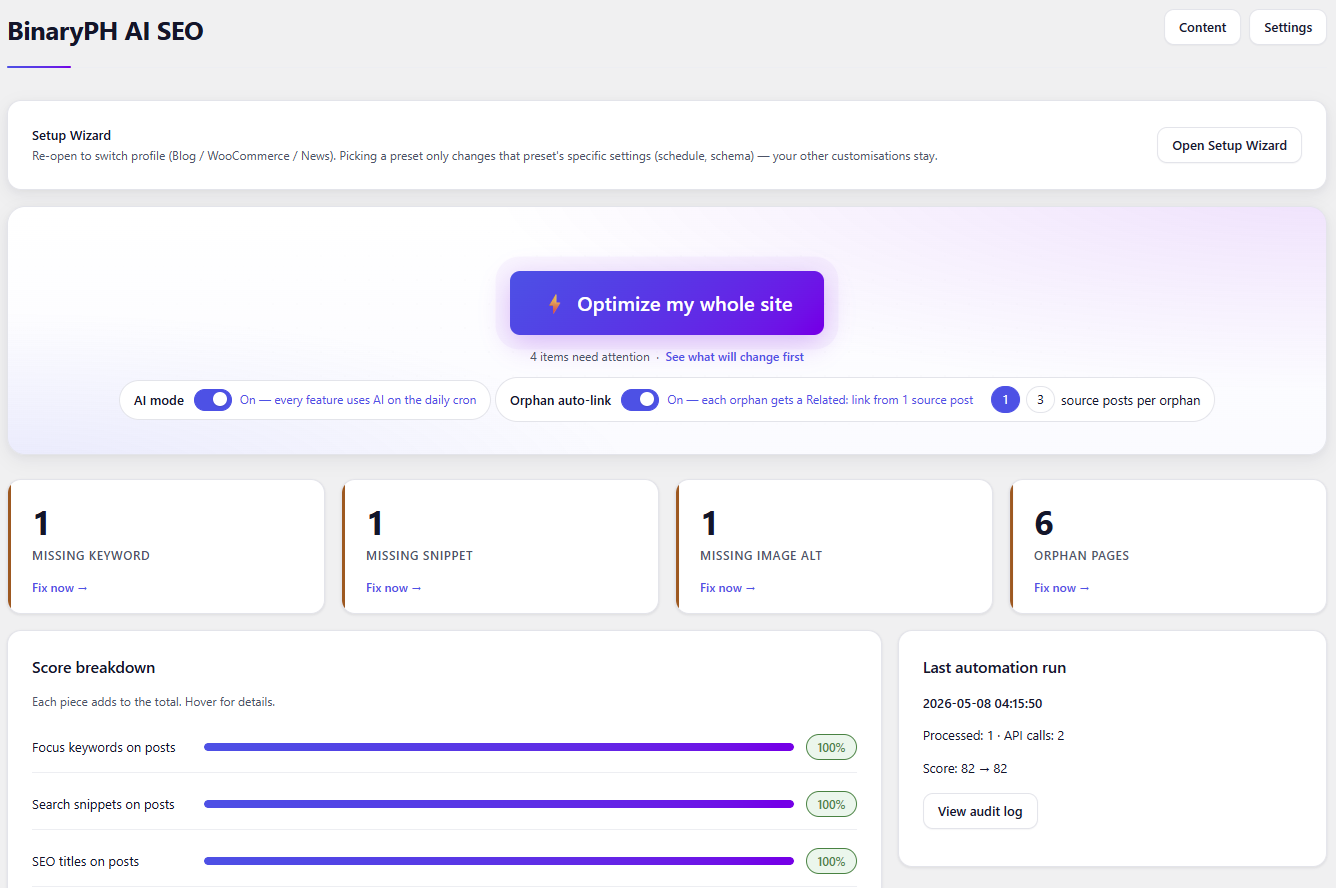
- 1-Click Site Optimization: Automatically generate missing focus keywords, SEO titles, search snippets, and image alt text (via Vision AI) across your entire site or WooCommerce store.
- Orphan Page Auto-Linker: Instantly detect pages with zero internal links and automatically inject contextual “Related” links from relevant source posts.
- Smart 301 Redirects & 404 Logger: Log broken links, filter out malicious bot noise, and seamlessly review and apply AI-suggested redirect targets with a single click.
- Next-Gen Schema & Sitemaps: Out-of-the-box XML sitemaps, robots.txt management, and 10+ rich snippet Schema types (FAQ, HowTo, LocalBusiness, Product). Even includes an
/llms.txtgenerator for modern AI crawlers. - Seamless Migration & Coexistence: 1-Click import your data from Yoast, Rank Math, or All in One SEO. Run BinaryPH as a standalone replacement, or alongside them in “Defer” mode to fill in the gaps.
- Bring Your Own AI: Securely connect your preferred AI platform. Supports Google Gemini, OpenRouter, xAI Grok, Pollinations, OpenWebUI, and local Ollama models. Your keys are encrypted at rest.
- Automated Background Processing: Set it and forget it. The built-in daily cron scheduler safely processes your 1-click batches, respecting your server limits and AI budget caps.
Faq
Have Any Questions ?
Gemini
Specify your desired model name from https://ai.google.dev/gemini-api/docs/models
To create an API key for the Gemini API, you primarily use Google AI Studio. Here’s a step-by-step guide:
- Go to Google AI Studio: Open your web browser and navigate to aistudio.google.com.
- Sign In: If you’re not already signed in, you’ll be prompted to log in with your Google account.
- Accept Terms: If this is your first time using Google AI Studio, you might be asked to review and accept the Google APIs Terms of Service and Gemini API Additional Terms of Service. Read them and check the necessary boxes to continue.
- Click “Get API key in Google AI Studio”: On the main page, you should see a prominent button that says “Get API key in Google AI Studio” or similar. Click on it.
- Create API Key:
- You’ll then have the option to “Create API key in new project” or “Create API key in existing project.”
- For most users, “Create API key in new project” is the easiest option to get started. Select this.
- Copy Your API Key: Once you click to create, your API key will be auto-generated and displayed. Immediately copy this key and save it in a secure location. This is crucial because you usually won’t be able to view the secret key again after this step.
- Close the Pop-up: After copying the key, you can close the pop-up or acknowledgment.
You now have a Gemini API key ready to be used in your applications!
Important Security Note:
Do not embed your API key directly in client-side code (like in web apps that run entirely in a user’s browser) for production applications, as this can expose it. For production, consider using server-side proxies or environment variables to manage your API key securely.
Never share your API key publicly. Treat it like a password.
OpenRouter
Select a model from https://openrouter.ai/models?q=free&order=newest
OpenRouter provides a unified API for various large language models. Here’s how to create an API key for OpenRouter:
- Visit the OpenRouter Website: Go to openrouter.ai.
- Sign In or Sign Up:
- If you already have an account, click the “Sign in” button (usually in the top right corner) and log in with your credentials.
- If you don’t have an account, click “Sign in” and then “Sign up” to create a new account. You can often sign up using your Google account or email.
- Navigate to API Keys: Once you are signed in, you need to go to the API Keys section. You can typically find this by:
- Clicking on your profile picture or icon in the top right corner.
- Looking for a menu option like “API Keys” or “Keys.”
- Alternatively, you can directly go to openrouter.ai/keys.
- Create a New Key:
- On the API Keys page, you should see a button like “Create Key” or “Create New Key.” Click on it.
- A pop-up or form will appear.
- Configure Your Key:
- Key Name: Give your API key a descriptive name (e.g., “My App Key,” “Development Key”). This helps you identify its purpose later.
- Credit Limit (Optional): You can set an optional credit limit for this specific key. This is useful for managing your spending and preventing overuse. If you leave it blank, it will usually allow full access to your account’s credit.
- Click “Create” or “Generate” to finalize the key creation.
- Copy Your API Key:
- Your new API key will be displayed. This is the only time you will see the full key string for security reasons.
- Immediately copy this key and save it in a secure place. Do not share it publicly.
Important Considerations:
Security: As with any API key, treat your OpenRouter key as confidential. Do not expose it in client-side code, commit it directly to public repositories, or share it with unauthorized individuals. Use environment variables or server-side solutions to manage it securely.
Credits: OpenRouter uses a credit-based system. Some models might have a free tier, but for consistent or higher usage, you will likely need to add credits to your account. You can usually find the “Add Credits” or “Manage Credits” section in your account dashboard.
Grok
Refer to https://docs.x.ai/docs/models for available models.
Grok, developed by xAI, provides an API for developers to integrate its large language models into their applications. Accessing the Grok API involves creating an xAI account and generating an API key through their console.
Here’s a step-by-step guide to get your Grok API key:
- Go to the xAI Console: Open your web browser and navigate to the xAI Console: console.x.ai.
- Sign In or Sign Up:
- If you already have an xAI account, sign in using your credentials.
- If you’re new, you’ll need to create an account. You can typically sign up using your email, Google, or X (formerly Twitter) account.
- Create an xAI Team (if prompted): For new accounts, you might be asked to create an xAI team. Provide a name and description for your team. You can skip inviting members if not needed.
- Set Up Billing (Required for API Usage): Before you can fully use the Grok API, you will likely need to set up billing information and purchase credits.
- Look for a “Billing” or “Credits” section in your xAI console.
- As of recent information, xAI might offer some free API credits monthly for new users to test the API. However, continued or higher usage will require purchased credits.
- Navigate to API Keys: Once you’re in the console and billing is set up, find the “API Keys” section. This is usually accessible from the left-hand sidebar or a dashboard link.
- Create New API Key:
- Click on the “Create API Key” button.
- Name Your Key: Give your API key a descriptive name (e.g., “My Application,” “Grok Test”).
- Select Endpoints/Models (ACLs): You might have options to select which endpoints or models this specific key can access. For general use, you might enable all models or specific ones like
grok-3-betaorgrok-3-mini-beta. You can also choose permissions likechat:writefor chat access orsampler:writefor raw model sampling. - Click “Create” or “Save.”
- Copy Your API Key:
- Your newly generated API key will be displayed. Crucially, copy this key immediately and store it in a secure place. For security reasons, you generally won’t be able to view the full key string again after this step. If you lose it, you’ll have to generate a new one.
You now have a Grok API key!
Important Notes for Grok API:
Security: Always keep your API key confidential. Do not hardcode it directly into your application’s source code, especially for public-facing applications. Use environment variables or secure credential management systems.
Payment Required: While there might be free trial credits, using the Grok API for substantial projects typically requires purchasing credits.
gRPC and Python SDK: Grok’s API primarily uses gRPC, and xAI provides an official Python SDK (xai-sdk) to interact with it, often compatible with OpenAI’s SDK.
Pollinations.AI
Refer to https://gen.pollinations.ai/text/models for available text models.
Pollinations.AI provides a single, OpenAI-compatible API for generating text, images, video, and audio. Accessing their API involves signing in to their platform and generating an API key.
Here’s a step-by-step guide to get your Pollinations API key:
1. Go to the Pollinations Dashboard: Open your web browser and navigate to the Pollinations
portal: https://enter.pollinations.ai.
2. Sign In: Sign in using your preferred method (e.g., Google or GitHub).
3. Create a New API Key: Once logged in, locate the section to generate a new API key. Pollinations
offers two types of keys:
- Secret Key (
sk_): Used for server-side applications with no rate limits (consumes your account’s “pollen” balance). Since WordPress processes the API requests on your server, you should generate a Secret Key. - Publishable Key (
pk_): Used for client-side or frontend applications, which includes rate limits (1 pollen per IP per hour) and supports their “Bring Your Own Pollen” feature.
4. Copy Your API Key: Your newly generated API key will be displayed. Copy this key immediately and store it in a secure place. If you lose it, you can revoke it and generate a new one from the dashboard.
You now have a Pollinations.AI API key!
Important Notes for Pollinations API:
- Security: Always keep your secret key (
sk_) confidential. Never expose it in client-side code like plain JavaScript. - OpenAI Compatibility: The Pollinations text generation API is fully compatible with OpenAI’s format. This means you can easily use it with standard OpenAI SDKs just by changing the base URL to
https://gen.pollinations.ai. - Pollen Balance: Pollinations uses a credit system called “Pollen.” Secret keys will draw from your account’s Pollen balance. You can check your account tier and balance within the dashboard.
OpenWebUI
See https://openwebui.com/models for compatible models.
Open WebUI also has its own API endpoints that allow programmatic interaction with the WebUI itself (e.g., for monitoring, automating tasks, or integrating with other systems). For this, you can generate an API key within Open WebUI.
- Enable API Keys (Admin Required):
- Log in to Open WebUI as an administrator.
- Go to Admin Settings > General (or similar section).
- Find a setting like “Enable API Key” and toggle it ON.
- Save changes.
- Generate an API Key (User Settings):
- Go to your User Settings (click your profile icon in the top right).
- Navigate to the Account section.
- Click “Generate New API Key” or similar.
- Give the key a descriptive name.
- Copy the generated API key and store it securely.
This key is for interacting with Open WebUI’s internal API, not for connecting to external LLM providers.
Error
- If you encounter an error when applying AI keyword suggestions to many posts, pages, or products, try selecting only 10 items at a time. This issue usually depends on your hosting capacity or a timeout limit set in your WordPress environment.
Other AI Products
Business Plan Partners
With our Business Plan, you get a fully hosted AI customer service agent running on our platform, no installation or database setup required on your end. We’ll configure your AI with up to 100 product descriptions and deploy it on our Customer Service portal. Your customers simply visit your branded page on our site to interact with the AI, and you can request content updates via email on weekends. We list your business as-is in our partners directory for extra visibility.
Premium Plan Partners
The Premium Plan is built for businesses that need a more advanced and flexible AI customer service experience. You’ll get your own smart AI agent deployed on a dedicated page within our website. This plan supports up to 1000 product descriptions and intelligent Q&A, powered by a Google Spreadsheet that you control. You can update your records anytime without needing to contact us. Your business will also be listed as-is in our partner directory for added exposure. Weekend email support is included for AI behavior tuning or assistance.
Enterprise Plan Partners
Designed for large businesses or those with specialized needs, the Enterprise Plan offers the most powerful AI customer service solution—fully hosted on our platform and tailored to your exact requirements. Pricing is customized based on your business size and AI complexity. Your AI agent will be deployed on a dedicated page within our website, supporting an unlimited number of product descriptions and advanced Q&A capabilities. Your business will be prominently displayed as-is in our partner directory, gaining high visibility among our user community.
Fact Checker
The fact-checker AI evaluates the accuracy of questions or claims by analyzing data from available online articles. It provides a truthfulness rating based on consolidated information, ensuring its assessments are data-driven and objective. Users can copy and paste social media headlines or captions directly for verification.
Scam Advisor
The Scam Advisor AI is a tool designed to help you evaluate the credibility of online claims, offers, or articles. By analyzing information available on the internet, it assigns a safeness rating based on recognized patterns of deception. Users can copy and paste headlines, messages, or links from social media directly into the AI to assess their potential for being scams.
People Finder
This AI is designed to help you find publicly available details based on search results. It extracts information such as names, addresses, contact numbers, email addresses, social media links, and other visible personal details. The AI also provides relevant links, including social media profiles, to create a concise profile summary of the search target.